How-tos
Recording with a Zoom H6
If you have suggestions on how to improve this document, or find mistakes, please send them to labman.gw@uu.nl
Introduction
For research outside the building, we have some solid state recorders available. You can borrow them from the lab technicians in room 0.09. Be aware that you have to reserve a recorder in the reservation system in advance. We have two Zoom H6 compactflash audio recorder available, which is available in the reservation system CF Recorder 5 and CF Recorder 6. Other options are the Marantz PMD671 audio recorders (CF recorder 1 and 2), or the Zoom H4 recorders (CF recorder 4).
The recorder is a small, handheld device, with four external microphone input ports, which each can be used as either XLR or 6mm Jack. On the top is an adapter to add extensions. The extensions available for the Zoom H6 are a stereo microphone, a shotgun microphone, an omnidirectional microphone or two extra external microphone inputs.
The Zoom H6 is the bigger, more advanced brother of the Zoom h4 recorder. Some features have been enhanced or added and the controls have been made more intuitive, but the functionality of both recorders is largely the same.
To borrow a Zoom H6 recorder, you have to reserve it in the reservation system.
When you borrow a Zoom H6 recorder, you get a flightbox case containing:
- Zoom H6 portable handheld audio recorder
- SD-card (mounted)
- 4 AA-batteries
- Two extra XLR/Jack inputs extension
- Omnidirectional microphone extension
- XY Mic
- Wind screen (sponge)
- USB cable
- Power supply
- Manual
These are the images from the manual describing the parst. Click the image with the center mouse button to view a larger version in a new tab.
The recorder
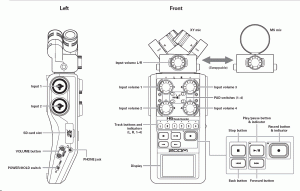
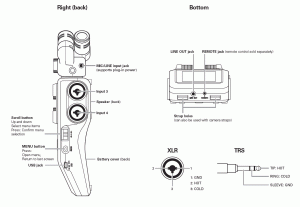
XY Mic extension
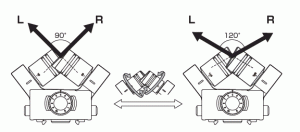
The XY mic extension can be used to record sound that is close or at a medium distance to the recorder. The microphones only record that which they are pointing at and record a wide dynamic range, so they are ideal for situations where you have to record a single participant or multiple participants who are sitting close together on the same side of the recorder.
The microphones can be switched to record in a small angle of 90 degrees, or a wider angle of 120 degrees. See the schema below
Omnidirectional Mic extension
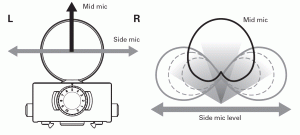
The omnidirectional mic extension is the one that looks like a ball. In the manual it is named the “MS Mic”.
The MS mic records stereo to either side of the ball, but it also records directly forwards (see the schema below). This makes it ideal for recording audio in a room where you want to capture anything that happens on multiple locations in the room. For example, when the participant(s) and experiment leaders sit on opposite sides of the table and they both have to be recorded.
The side mics can be switched off as well, with the switch on the side.
Extra inputs extension
The extra inputs extension you will rarely ever have to use. This is only going to be useful if you have 6 seperate audio sources that need to be recorded in extreme high quality but at different intensity levels. Up to four of these sources, you don’t need any extensions at all and you can simply use the build-in inputs. The inputs on the extension work exactly the same way as the built-in inputs work
Shot-gun mic extension (reserve seperately)
The shotgun mic extension can be used if you need to record a sound source at a distance of the recorder and when you don’t want to pick up sounds around it. It is a highly directional microphone. The shotgun mic extension works similar to the other shotgun mics we have available, but this one can be attached directly to the device which can have some advantages, but also some disadvantages. Consult with the lab support before making this decision.
1) Decide what microphones to use
Decide which of the microphone extensions you want to use, or if you would rather use the external microphones (or a combination). Connect those microphones to the recorder. Do this with an XLR or Jack cable for the external microphones or by carefully attaching the extension to the recorder in case of any of the other microphones.
2) Connect headphones
If you have headphones, connect them to the headphones plug.
3) Select power source
If you have a power supply and a power outlet you can use, best plug in the power supply. Otherwise, use the batteries.
4) Switch on the device
Switch on the the device by holding the power switch down for a few seconds (until the screen lights up).
The screen might look quite complex the first time you look at it. Luckily, everything is explained in the manual. Take a look at the image below (copied from the Zoom H6 manual):
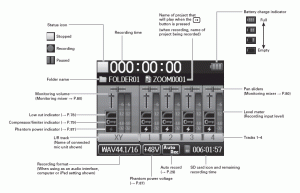
5) Set the recording quality
Decide which recording quality you want to use. You can record in either WAV or MP3. In case you choose for WAV, you can select the bit depth (16 or 24) and the samplerate (44.1kHz, 48kHz, 96Khz. In case you pick the MP3 format, you can set the bitrate (between 48kbps and 320kbps). Which format you will want to use depends on what you are recording the audio for and how much space you have to save the recordings. The highest quality is WAV96kHz/24bit, which also takes the most space. The lowest quality is MP3 48kbps, which hardly takes any space at all. Generally, you will only need to use the WAV96kHz/24bit mode if you intend to create a studio quality music CD. If you are only recording speech so you can listen back to what was said during the recording, MP3 48kbps should be more than enough, as this will be enough to hear what people are saying. This does, however, depend on the external factors. If there is a lot of wind or other noise, you might want to use a slighly higher recording quality. If you record for ZEP, you should use the WAV48kHz/24bit mode. If you want to do phonetics research on the recording, you might want to chose any of the 24bit modes, depending on the quality you need. Make sure to take a large enough SD card with you if you plan to record in high quality.
Once you decided which quality to use, click menu on the right side of the recorder to open the menu. Use the jog dial to go to the red circle (the rec menu) and then click the jog dial. Go to rec format and select the recording format you intend to use. Clicking the menu button will take you back to the parent menu. You can keep clicking this button to return to the home screen. There you will see the currently selected recording format in the left bottom corner.
6) Enable or disable phantom power
Decide whether you want to use phantom power. Phantom power should only be used when you have a microphone that requires external power. Enabling phantom power when your microphone does not need it will result in a poor quality recording in the best case and will damage the microphone in the worst case. If you are unsure whether to use phantom power, ask technical support in room 0.09. To enable or disable phantom power, open the menu, go to the microphone icon (INPUT&OUTPUT) and then to phantom power. There you can enable or disable phantom power for each of the separate inputs.
7) Enable the microphones
After you connected all your microphones, use the track buttons to select the inputs you want to use. The buttons should light up when the corresponding input is enabled. Clicking it again will switch the input off again. Once an input is enabled, the audio level meters for that input will start to show the input level. Position the microphone to how you want it to be positioned during a recording. As a general rule of thumb, the closer the microphone is to the source of the sound, the better the recording quality, but the easier it is for the participant to accidentally touch the microphone (especially with children, this might be a problem). You can now set the gain, to make sure your audio signal isn’t too low to be picked up, but not too high to clip in the recording:
8) Set the gain
Ask the person that will provide the sound to make the same sounds they will make during recording (this can be speech, singing, making noises or anything else, but make sure it’s the same type of sound they will make during the recording). Check if the meters move. The louder the sound, the higher the meter should jump. Use the gain dials for the microphone you are using to set the gain to such a position where the meters do not touch the red part on the top of the meter bar when the audio source is making the sounds at the loudest level they will make during recording.
For the best recording quality, the microphone is as close to the audio source as possible and the meters go as high as they can without ever touching the right red bits. When the microphone is further removed from the audio source, you will need a higher gain. Whenever your gain is too high, meaning the meter will touch the red of its bar, clipping will occur, meaning you will lose data. This is why you always want to test with the loudest the source is like to be during recording. When the gain is too low, you will hardly hear anything on the recording. This can usually be amplified, but not without severe quality loss. This is why you don’t want the audio source to be louder during testing than it will ever be during recording. Whenever possible, it is good to try to keep the audio source as much at the same audio level as you can as well, but this can often be hard.
If you haven’t done a lot of audio recording before, it is a good idea to experiment with the device for a time, before asking participants to come in. This will help you in knowing what to do and make the participant less wary of having to wait for you to set up the equipment.
9) Apply a compressor
A compressor affects and audio recording by automatically reducing the gain when levels get too high. This allows you to set the gain higher than you would otherwise for the risk of clipping. The Zoom H6 has three compressor profiles that can be toggled for each input. These can be accessed through the menu in the recording tab.
A compressor is desirable when recording subjects with a wide dynamic range, for example a meeting with multiple people standing at different distances from the microphone. The higher gain will allow for those standing further away to still be audible, while preventing those standing close by from being too loud.
If your require an accurate representation of loudness in your recording, then a compressor is not for you. This could be the case for phonetics or emotive language research. In either case you should know if the compressor is enabled, as having it on or off incorrectly can ruin a recording. The compressor’s state for each channel is visible through the “Comp” light on the recording screen. If in doubt: check the recording menu to make sure.
The different compressor profiles produce slightly different results. We recommend using the general profile for most cases. However, feel free to experiment.
10) Start the recording
Once you are satisfied with how the preview sounds, you can start the recording by pressing record. As soon as the light on the top left of the recording button is burning red, the device is recording. Make sure you, or someone else, keeps checking the device to see if everything keeps working correctly!
To stop recording, just press record again. This should stop the recording simultaneously to the light in the recording button going off.
You can then play back recordings by pressing play on the front. You can use the buttons on the front to select the track you want to listen to as well, and search within that track for a specific time.
You can connect the recorder to every computer that has a USB interface. The recorder will behave as a kind of memory stick. You can copy the .wav and .mp3 files to your computer. (Don’t forget to make a backup copy, for example on a dvd or cd-rom!)
To connect the computer to the recorder, follow these steps:
- Take the USB cable and connect it to the recorder and the computer.
- Open te menu, go to the USB symbol and select “SD card reader”.
- Within a few seconds, the recorder should be visible in your file explorer.
Please remove your audio files after you copied them and before you return the recorder to room 0.09.
You can either delete the files manually from the computer or from the recorder, or format the card entirely. Check the manual for instructions on how to format the SD card.

