How-tos
Recording videos with OBS studio
If you have suggestions on how to improve this document, or find mistakes, please send them to labman.gw@uu.nl
Within the ILS Labsoratories we capture video using Open Broadcaster Software studio (OBS studio). It is free and open source software for video recording (and live streaming) and available on Windows, Mac or Linux.

Record Video
Each lab setup comes with a default profile and scenes (Default-ils-OTS). To capture video do the following:
- Start OBS studio:
- Kubuntu OS: Click on the start icon at the bottom-left and search for OBS studio by typing ‘obs‘.
- Windows OS: Click on the desktop icon for OBS studio.
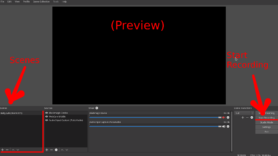
- Select the room/lab number you are in at the Scenes tab.
- Press the button labeled Start Recording at the right-hand side.
- When the capture is complete press the button labeled Stop Recording at the right-hand side.
- Backup your video files! The video files are stored in the following default locations:
- Kubuntu OS:
/home/<USERNAME> - Windows OS:
D:\Users\<USERNAME>\Videos
- Kubuntu OS:
Customise Profiles or Scenes
Configuring the output, registering the input and setting up scenes is complicated. If you are interested in the advanced use of OBS studio we recommend looking up on-line tutorials.
Any changes you make to the (default) profiles/scenes of OBS are only done so in the scope of your local system. The changes to profiles/scenes do not apply for other users or at other systems. Do not customise default profiles/scenes since these can be overwritten when updated. This entails the loss of all personal configuration.
For Kubuntu a single all-encompassing scene collection and a single profile is configured for the entire lab. The default files are in /etc/skel/.config/obs-studio. Files are automagically (r)synced based on modification date between a user’s configuration (~/.config/obs-studio) and the skeleton during every login. To reset simply remove the ~/.config/obs-studio folder .
For Windows 10 there are default settings manually set for each system. The default files are in the C:\Users\Default\AppData\Roaming\obs-studio folder. Files are only copied over to the %userprofile%\AppData\Roaming\obs-studio folder when a user profile does not yet exist at login. To reset either delete the entire user profile or replace the user’s setting folder with the default one.
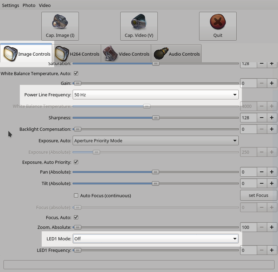
When webcams are turned on, they switch the leds/lights on by default. This isn’t very appropriate at all times, since it can distract infants.
You can change this behavior using a program called guvcview, you can start this by pressing alt + space this opens a bar that resembles Apple’s spotlight and type guvcview and then you can select the right program. You should set the power frequency to 50 Hz, this reduces visible noise. Additionally using the dropdown “LED1 mode” you can turn the led of.

Unfortunately, you’ll have to do this each time you turn the pc on. (We are looking for a way, to give the settings a more permanent behavior, if you discover something please let us know.)

