How-tos
Recording audio in the phonetics lab
If you have suggestions on how to improve this document, or find mistakes, please send them to labman.gw@uu.nl
Introduction
The following procedure describes how to make a good quality audio recording using the equipment at the cabins in the phonetics lab (room K.10).
Preparation
- If you’re new to the lab, read the Introduction Guide to the ILS Labs.
- Make sure you’re familiar with our house rules.
- Reserve the recording cabin of your choice (from the reservation system page click phonetics lab). Except for size the four cabins are basically identical.
- Be in the lab 10 minutes before your speaker is expected to arrive. Clean up the cabin if necessary and power on the equipment (see next steps).
Power-On Equipment
The PC’s in the labs are capable of running Windows and Linux (selectable at startup). Here we assume you’ll be running Linux as that is more convenient to use in our current set-up. Power up the PC or reboot it if it is running Windows; from the (blue) boot menu select Real-time Linux (the default). Log on using your Solis-ID.
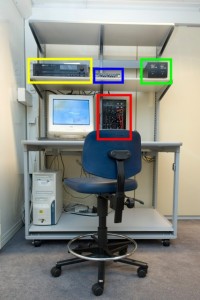
The microphone preamplifier is the device indicated in blue (see Phonetics Lab Device Setup).

The microphone preamplifier has three “groups” of buttons on it. The group on the right contains only one button: Phantom Power.
The microphone preamplifier doesn’t have an on/off switch so it is always on, but the microphones aren’t. Make sure the Phantom Power button (in the right most field) is pressed down, to turn on the microphones.
There are two microphones in the cabin. The mounted microphone on the adjustable arm is controlled with the left most field, indicated in pink on the picture and with the text “Microphone 1” on the microphone preamplifier. The other microphone is the one in the headset, which is only used for specific experiments. This microphone is controlled with the field indicated in baby blue (baby blue) in the picture and with “Microphone 2” on the preamplifier.
Controlling the microphone works the same for both microphones, which is why both groups of buttons look exactly the same.
For the group that you don’t use, turn down the gain dial completely, by turning it all the way to the left.
For the other group, ensure the following settings:
- Gain: 40 dB (typically). This means the white line is at the top of the knob.
- 15dB pad: Out. The button should not be pressed down.
- polarity: 0°. The button should not be pressed down.
If the audio turns out to be very soft, you should double check the system settings for the audio. You would like to set the microphone volume to 100%.
The Marantz headphones amplifiers are the devices indicated in green (see Phonetics Lab Device Setup).
To be able to listen to a recording using headphones, you need to switch on both Marantz headphones amplifiers. The Marantz headphones amplifiers are switched on when the power light is green.
Setup Audacity Audio Recording Software
You can start Audacity (Applications > Sound & Video > Audacity).
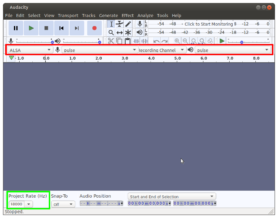
In the bottom left corner of Audacity, you should see a dropdown menu with the title “Project Rate (Hz)”. This project rate is typically set to 44100, but for the setup in the Phonetics lab, you need to set it to 48000.
In case you restart Audacity, recheck this setting, because it isn’t saved through sessions.
- Check if Audacity is using pulse as it’s recording and playback devices. See the area marked red in the image to the right.
- If not, select pulse in the dropdowns (next to the microphone and speaker icons)
- Check if the project rate is set to 48000 Hz; see the area marked in green.
- If not, set it to 48000 Hz.
If you want to hear what the microphone records:
- Go to the Recording tab in the Preferences dialog (under ‘Edit’ in the toolbar at the top)
- check the box for Software playthrough of input
You should be able to make a recording now in Audacity!
If this didn’t work out, please reboot your computer and check all settings again.
If you’ve ended up here again and you still can’t seem to record, get one of the technicians in 0.09 to check with you.
Microphone Position
- Seat your speaker behind the desk in the cabin.
- Adjust chair height and back if necessary.
- Make sure the chair is rotate-locked.
- You may want to provide the speaker with a glass of water (clean up afterwards). No milk or other dairy products should be consumed before a recording session. To reduce lip smack sounds the speaker may use a little lip balm (no heavy lip gloss).
Note, nervousness also increases lip smack (give water). - Instruct the speaker to sit against the back of the chair and to move as little as possible.
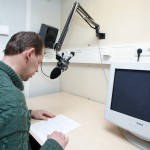
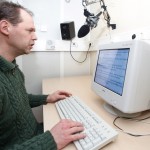
The microphone should be about 25-30 cm from the speaker’s mouth but he or she should not speak directly into the microphone. Otherwise plosives might produce popping sounds and breathing sounds will be more apparent. In our set-up it is best to raise the microphone above the speaker’s view (depends on whether the speaker reads from paper or from the display monitor) and point it in downwards angle to the chin or lower. Ideally the microphone should be in front of the speaker; if it is not then head movements while speaking will cause audible differences. See images below.
Give the speaker a short text to read aloud while you adjust the recording level. Refer to the next step, Recording Level Adjustment, to know how to test your setup correctly.
If you are experiencing noise, such as faint hissing or humming, please refer to the Noise management section of the Audio Troubleshooting and solutions in Audacity page.
Recording Level Adjustment
First of al, you should make sure that in the system settings, the microphone volume is turned to 100%, then whether you can/need to improve the volume with the microphone amplifier.
The Audacity program also provides an input level meter (two bars labelled L and R next to a microphone symbol). Click on it. To see more detail you may want to undock or float the input level meter (try it). While the speaker is reading aloud adjust the microphone preamplifier gain (for microphone 1).
Make a short test recording using Audacity and play it back. To listen to it inside the cabin you should either switch on one of the active speakers hanging from the cabin walls (don’t forget to turn off again) or use the headphones.
Outside the cabin you can connect headphones to the patchpanel through the short red extension cord. For this you have to use one of the headphones sets present in the control area; do not remove headphones from any cabin.
If you don’t hear anything, check if you enabled Software Playthrough. Go back to ‘Setup Audacity Audio Recording Software’ item 4 to see how.
Recording
- If the test recording sounds OK tell the speaker to wait for your signal.
- You may want to instruct the speaker to begin the reading session by saying their name and the date and/or time.
- Close the cabin door.
- Make sure the Audacity window is empty (no recordings. Save previous recordings if you want to keep them).
- Start the recording, wait 5 seconds and signal the speaker through the intercom.
- During recording you can hear the speaker via the intercom.
- Listen carefully and mark the script at each mistake. If you want a passage to be read again, you can either interrupt via the intercom, or let the speaker finish the script and then have him or her read it a second time (preferred).
- Although it is possible to listen to the actual signal entering the PC this is not recommended as this signal would also be audible on the headphones inside the cabin. Ask technical support if you want to test this option.
To save a recording you need to export it as a wave file: In Audacity choose Export As WAV… (do not save it as a project).
Recordings as described here take 5.8 Mb of disk space per minute. If you need to make many or long recordings it is usually preferred to store the raw recordings initially on the system’s local hard disk instead of in your personal account on the server. You can then trim the raw recordings to reduce size and save the trimmed versions into your account.
Citing Audacity
On Linux, we’ve currently installed version 2.0.0 of Audacity, on Windows we have version 2.0.3 installed (last check: 2015-07-02). We recommend that you check the version number when you run any experiment in order to report it correctly. You could cite Audacity in your paper as follows:
For this work I used version 2.0.0 of Audacity(R) audio recording and editing software [1].
Or in your references section as:
Audacity Team (2014). Audacity(R): Free Audio Editor and Recorder [Computer program]. Version 2.0.0 retrieved April 20th 2014 from http://audacity.sourceforge.net/ [1].
In both cases [1] refers to a footnote:
[1] - Audacity(R) software is copyright (c) 1999-2014 Audacity Team. Web site: http://audacity.sourceforge.net/. It is free software distributed under the terms of the GNU General Public License. The name Audacity(R) is a registered trademark of Dominic Mazzoni.


